30 June 2015

Featured Designer: Heavy Weight Illustrator Justin Mezzel

Today’s featured designer is UI/UX and illustrator Justin Mezzel from Florida. Captivating audiences everyday with his unique style of art.

I’ve been obsessed with Justin’s unique work for more than a week now. The grainy textures and amazing color matching is the reason why I’ve managed to wake up since Sunday. Specializing in illustration, digital art, and UI/UX design, Justin has infused a bit of retro-ness with fine lines and flat-style imagery.

For more of Justin’s work, head over to his portfolio and read about his adventures.

To Resolve 2015

Featured Designer: Heavy Weight Illustrator Justin Mezzel

La Telephone: A Love Story

Featured Designer: Heavy Weight Illustrator Justin Mezzel

Essentials of

Featured Designer: Heavy Weight Illustrator Justin Mezzel

Motion Study

Featured Designer: Heavy Weight Illustrator Justin MezzelFeatured Designer: Heavy Weight Illustrator Justin Mezzel Featured Designer: Heavy Weight Illustrator Justin Mezzel Featured Designer: Heavy Weight Illustrator Justin Mezzel

29 June 2015

Daily Freebie: 10 Grunge Blurred Textured Backgrounds

Today’s daily freebie comes from Dreamstale – a sweet resource centre for graphics. In order to communicate through design, background and textures are often utilized.

This pack contains 10 high-resolution grunge blurred textured backgrounds that’s ideal for that design project including websites, presentations, or even your desktop wallpaper. Free for personal or commercial projects, each jpeg file size is approximately 3000 x 2000 px, saved at 240 dpi.

Download after the jump!

Daily Freebie: 10 Grunge Blurred Textured Backgrounds

Get grungy blurred

ILT 2015

24 June 2015

Featured Work: Colors of Life by Giorgio Cravero

Today’s featured work comes from Italian photographer and art director Giorgio Cravero. He’s brought us his seminal work of art titled ‘Colors’

To create awareness of the slow destruction mankind is causing Mother Nature, he’s created this series of images that exposes life and decay. Through these thought provoking imagery, Giorgio hopes to inspire all of us to take a step back and realize that we need to take responsibility for our actions before it’s too late.

To check out more of Giorgio’s work, head over to his portfolio

Featured Work: Colors of Life by Giorgio Cravero Featured Work: Colors of Life by Giorgio Cravero Featured Work: Colors of Life by Giorgio Cravero Featured Work: Colors of Life by Giorgio Cravero Featured Work: Colors of Life by Giorgio Cravero Featured Work: Colors of Life by Giorgio Cravero

23 June 2015

How to Use Lens Flare to Create Water Droplets in Photoshop

Today’s tutorial is a contribution from Dana Sabilsky. Have you ever noticed how one small detail can make something look a hundred times better?

In some cases, Photoshop can add such details to an image, making the depth of field effect more professional to the subject captured.

Today we’re using the lens flare tool to create realistic water droplets to make a Coke bottle appear more refreshing. Here’s what we’re trying to achieve.

Tutorial Using Lens Flare to Create Water Droplets

Now that we know what the final result looks like, let’s begin!

Step 1

Tutorial Using Lens Flare to Create Water Droplets step-1

First I start off with my coke bottle subject and I zoom in a good bit to focus more on the logo which is the selling point of the product.

Step 2

Tutorial Using Lens Flare to Create Water Droplets step-2

Simply create a new layer with ctrl+N and make sure it is on top of the backgroud layer.

Step 3

Tutorial Using Lens Flare to Create Water Droplets step 3

Select the ellipse tool. This is what we are going to be making our beautiful water droplets with.

Step 4

Tutorial Using Lens Flare to Create Water Droplets step 4

In order for this to work, you’ll need to click on the color swatch in the top left. I make it a nice 50% grey.

Step 5
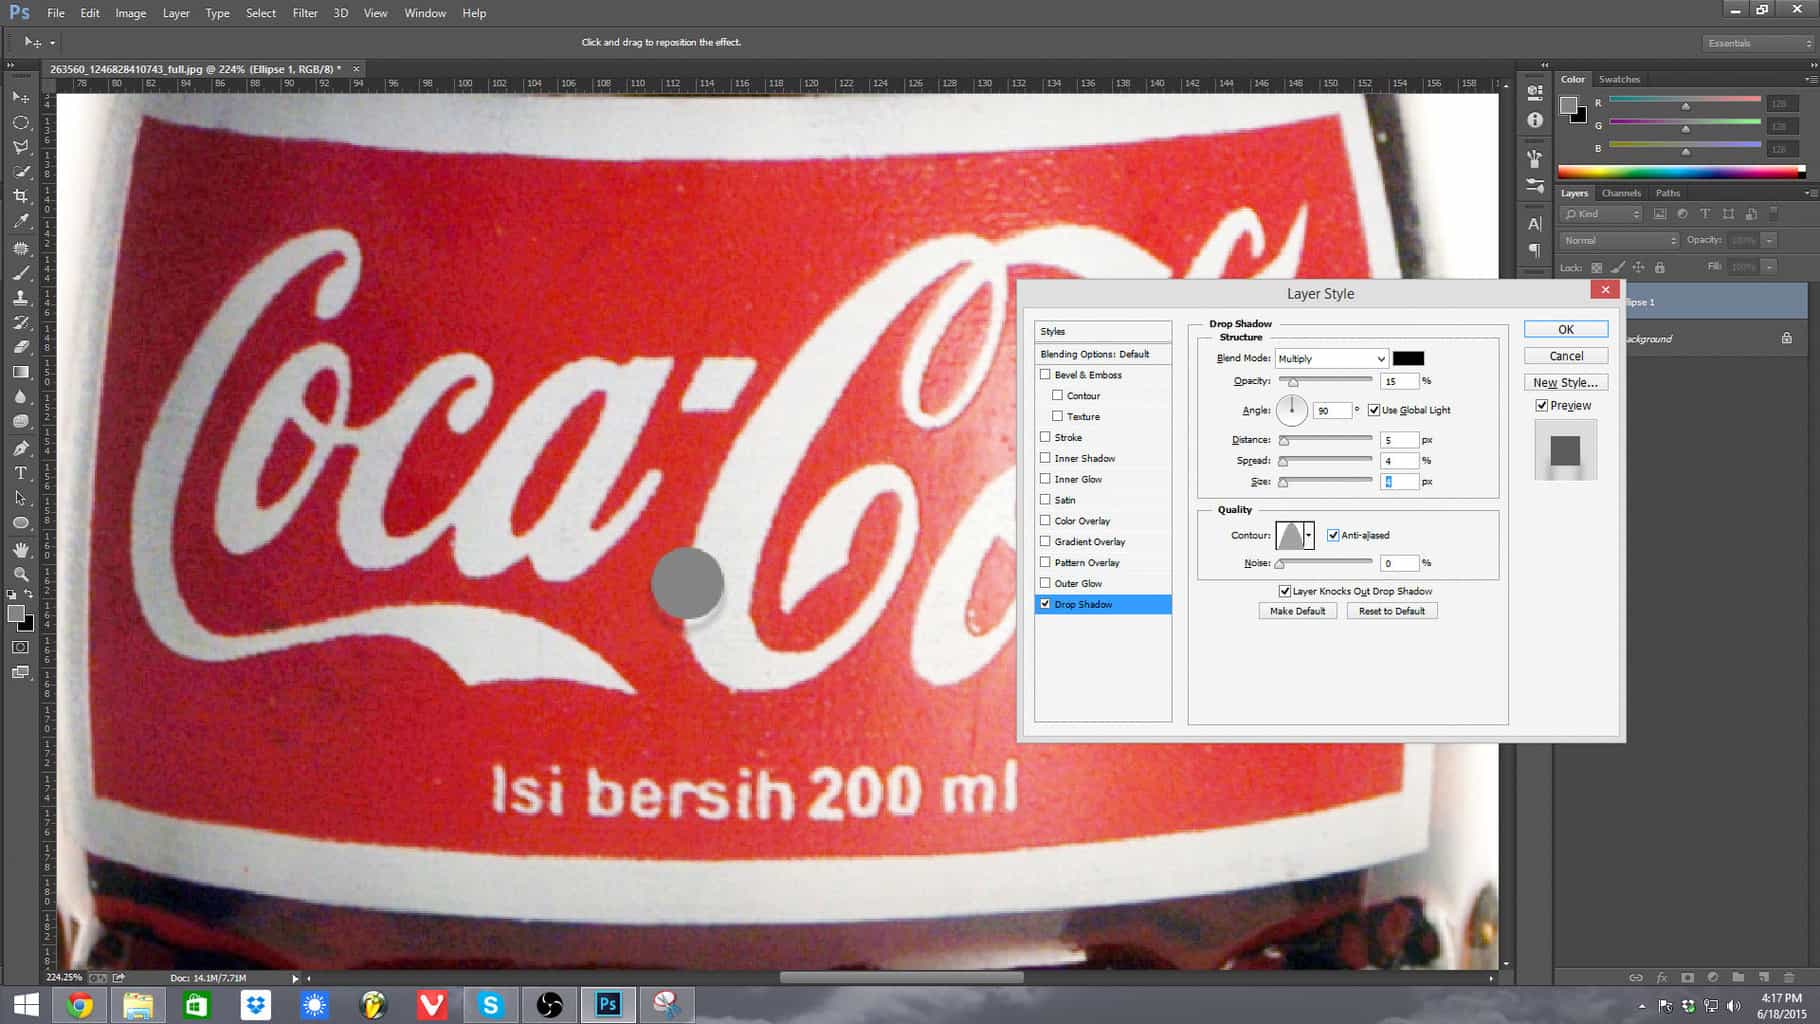
Tutorial Using Lens Flare to Create Water Droplets step 5

I hold SHIFT and click and drag to create a perfect circle filled with the 50% gray. Once done, I open up the blending options by double clicking on the layer on the far right side in an empty space, not on the picture or on the text. From here, I enable the drop shadow and adjust my options accordingly:
• Leave the blend mode at MULTIPLY
• Opacity: 15%
• Angle: 90%
• Distance: 5
• Spread: 4
• Size 4
• Click the contour and change to the second option
• Check Anti-aliased

Step 6

Tutorial Using Lens Flare to Create Water Droplets step 6

Next we are going to add in an Inner shadow with the following adjustments:
• Blend mode: Multiply
• Opacity: 15%
• Angle: 90
• Distance: 5
• Choke: 0
• Size: 5

Step 7

Tutorial Using Lens Flare to Create Water Droplets step 7

Next up, the inner glow. Don’t worry, you won’t have a glowing water drop once we tweak it. Here are the specs for this section:
• Blend mode: Multiply
• Opacity: 20%
• Change the color to BLACK
• Choke: 0
• Size: 5

Step 8

Tutorial Using Lens Flare to Create Water Droplets step 8

This is the step that makes the water drop really look more like a water drop. We are going to add some bevel and emboss. Lots to do here so lets jump in.
• Keep the option at INNER BEVEL
• Size down to 15px
• Angle: 90
• Altitude: 70
• Highlight mode: Normal with WHITE
• Opacity: 100%
• Shadow mode: OVERLAY with WHITE
• Opacity: 90%
Click “OK”

Step 9

Tutorial Using Lens Flare to Create Water Droplets step 9

I should have done this earlier, but it doesn’t matter what order. Also make the layer itself set to OVERLAY.

Now you have a beautiful and perfect water drop and it wasn’t too hard to make. On that layer, you can also grab your brush tool and draw in water where you see fit. If you want added realism, there is one more you can do. Let’s keep going!

Step 10

Tutorial Using Lens Flare to Create Water Droplets step 10

To avoid making permanent changes to the original background layer, I select it and press CTRL+J to make it a copy. With that highlighted, I hold CTRL and click on the picture of the water drop layer. This will make the selection you see. We are going to add a ripple to the area going to Filter > Distort > Ripple.

Step 11
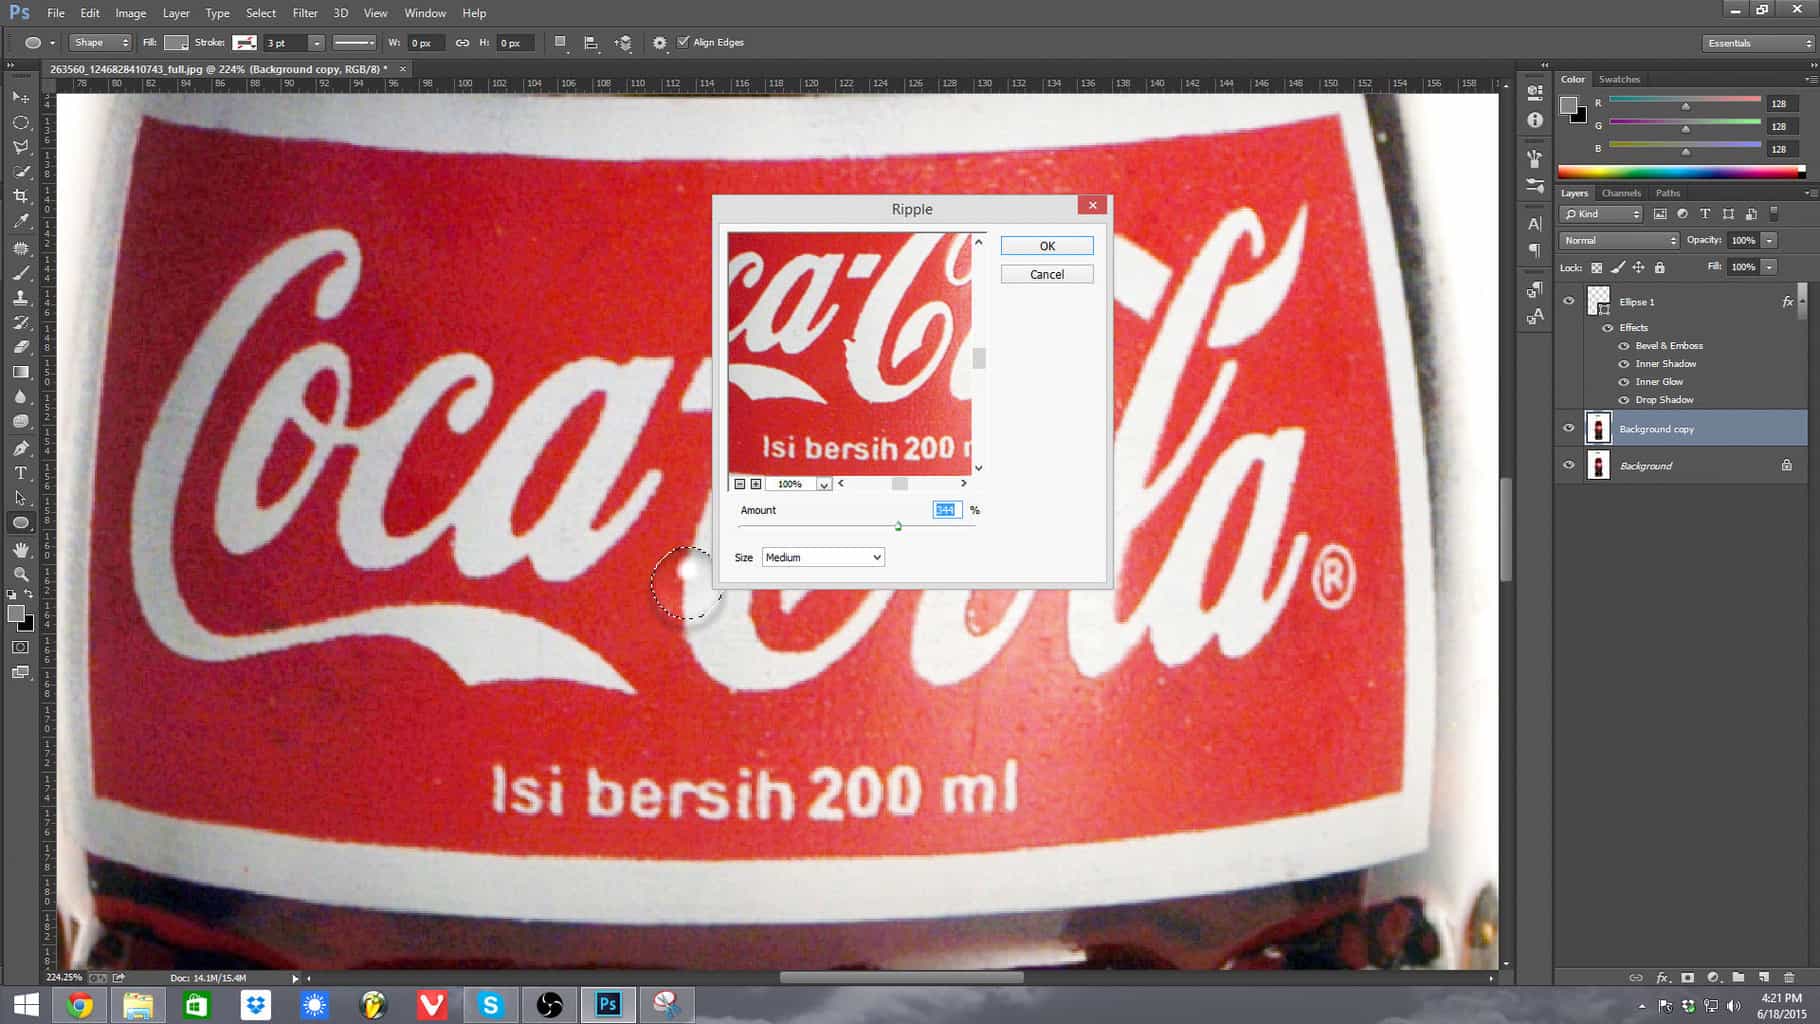
Tutorial Using Lens Flare to Create Water Droplets step 11

Whatever is under a water drop is normally distorted a little. This is how we are going to add our realism. Tweak the ripple via the slider to get the distortion you are looking for. You can add as many of these water drops as you like.

Thank you for creating water droplets with me! This technique can be used for so many different things. The only limit is your own imagination.

22 June 2015

Daily Freebie: High Quality Stationery Mock-Up (PSD)

Today’s daily freebie comes from a design studio that specializes in creating corporate identity mock-ups called forgraphic.

To start showcasing your stationery designs with elegance and class, this freebie gives you business cards, a cool memo pad and a calendar. Perfect for brand identity design comes in PSD and has a 300 dpi resolution at 4288×2848 pixels.

Every element is editable as smart objects and the background is easily changeable. There’s even a PDF help file to help you get things moving. To download, scroll to the end.

Daily freebie: High Quality Stationery Mock-Up (PSD)

Station

Featured Work: Traditional with a Modern Touch by Anagram

Today’s featured work comes from Anagrama, a design studio based out of Mexico. They’ve brought us a sweet brand and identity concept for a traditional cantina.

“Botanero Moritas” is a Mexican cantina located in San Pedro Garza García, México that serves up delicious regional cuisine from Northern Mexico.

With its rich tradition and history, the owner of Botanero Moritas wanted to target young adults and therefore approached Anagram for a revamp of their restaurant as well as a rebranding. Anagram developed a casual dining environment and modernized the interiors while still keeping it as close to the original décor.

For a more in depth look at the cantina, head over here.

Traditional with a Modern Touch by Anagram Traditional with a Modern Touch by Anagram Traditional with a Modern Touch by Anagram Traditional with a Modern Touch by Anagram Traditional with a Modern Touch by Anagram Traditional with a Modern Touch by Anagram Traditional with a Modern Touch by Anagram

Traditional with a Modern Touch by Anagram Traditional with a Modern Touch by Anagram