22 March 2016

Why PUA Encoded Fonts are Good for the Design Industry


A font is just a font right? You buy it, download it, and install it, done! Not quite……

For years font designers have created fonts specifically targeted at Graphic Designers who have access to premium software, which is ok, if you can afford Adobe Suites and the like. But what if you can’t?

Saving money is the start of making money, so what if you didn’t have to buy expensive design software just to access all the font glyphs? Well now you can! Introducing FontBundles.net – a premium font marketplace offering fully accessible PUA encoded fonts.

PUA (Private Use Area) encoded fonts are fonts which have been assigned Glyphs you can use in Character Map and Fontbook. Character Map is a free windows software application which shows all the glyphs of that particular font. Fontbook does the same but for Mac. With this anybody can access the font extra special glyphs which were once only accessible to the higher end software purchasing customers.

So what is so special about this? Well this opens up a whole need industry and of font consumers. People who work with Arts and Crafts as both a hobby and as a business are able to get exactly what they have paid for without going out and spending more than they have to. Software such as Cricut Design Space and Silhouette Studio which a lot of crafts people use are able to function as they should and people are generally able to consume fonts which were once inaccessible. This is great news for designers, retailers and the consumer, the industry becomes a bigger place and more people are able to enjoy their fonts for what they were designed to do, create and design!

revolution font bundleSo where does this leave you if you are a crafter? Well, the first thing is you can create some new, exciting and pretty awesome designs. Things you couldn’t made before. Even better is the fact that to celebrate a revolution in the industry FontBundles.net have released a Craft Font Bundle which contains 40 fully PUA encoded fonts for only $29. Saving you a cool 95% off the RRP and $571. To the future on beyond!


20 March 2016

Best Free alternatives to Placeit.net

Placeit is a great service that lets you instantly mockup screens in devices. Unfortunately, Placeit.net gets very expensive.

There is a free option that allows you to download a small version with an unlimited license but the size is only 400×300 px. After that size it suddenly becomes very expensive. An unlimited license for a large photo 1920 x 1440px costs $8 and super high quality photo 3300 x 2475 costs $28. At that point, you might as well hire a graphic designer.

Don’t worry we’ve rounded up a few of our favorite free alternatives to Placeit.net

Smartmockups mockup

Smartmockups.com

Smartmockups is one of our favorite competitors to Placeit. They allow you to mock up screens in desktop, laptop, tablet, smartphone, and watch devices. All images can be downloaded at full resolution and come with a royalty-free license. This means there are no restrictions on where you use the image or what project. You can use them on both the web and print. They even give you four sizes to choose from to download!

Smartmockups has the largest library of the images and is the closest to Placeit even though they don’t do video or apparel.

MockupsDrop

MockDrop

MockDrop is built by Maximilian Beck. It has a decent collection of images for a smartphone, laptop, desktop, watch, and tablet. MockDrop allows you to upload the image and process in your browser. The size of the images you can download changes depending on the image you choose.

Mockups Jar

Mockups Jar

Mockups Jar allows you to create photorealistic mockups. Like the other services they make it easy to create proof of concept for your app or website. They give you a bit more flexibility over Mockup Jar with the ability to sort images by Iphone, Android, Macbook, frames, and flat desktop browsers. It was created by the folks at Icenodes kudos to them!

Magic Mockups

Magic Mockups

Magic Mockups is another real life mockup generator. Like the other options the images are uploaded and then you can download a high-resolution image. Magic Mockups has less image options than Smartmockups with only 24 images to choose from. There are a few unique images that are worth checking out if you are getting stuck with the other photo libraries.

flat iphone 6 mockup templates

Photoshop Mockups

If you just need a plane photoshop file to mock up we have a huge roundup of the best Photoshop mockup design templates. You can grab free downloadable files for Photoshop, Sketch, and Adobe Illustrator. There are both photorealistic, flat, and wireframe files.

18 March 2016

Are Your Website’s Images Telling the Wrong Story?

 
We’ve all heard the clichés about photographs: A picture is worth a thousand words, every picture tells a story, and so on and so forth. And while the words themselves aren’t exactly original, the message is still important.

When it comes to your website design, photos are a critical piece of the puzzle. Your words are important, but the photos you select give your visitors a sense of who you are before they even read a single word. Your website’s photos help establish your brand, by setting a particular mood or conveying emotions, or by highlighting your products.

designer collageGiven how important photos can be to telling your brand’s story, it’s surprising how many companies actually get it wrong when it comes to choosing photos for their sites. Often, the poor photos are due to a desire to save money (i.e., they only use photos from free or inexpensive stock sites, or use their own photos, none of which are great quality). In other cases, the site owner simply doesn’t know any better and just picks photos that he or she thinks look okay. When designing your own do-it-yourself website for the first time, it can be a learning experience about what works and what doesn’t.

The problem isn’t just limited to those who create their own website, either. Often, professional designers make poor photo selections themselves, usually at the direction of a client.

The good news is that it is possible to avoid bad photos that tell the wrong story — and it doesn’t have to mean investing thousands of dollars in photography or reinventing the wheel. It only requires knowing what to avoid and what to look for in website photography.

Common Photo Mistakes

Obviously, everyone knows — or should know, at least — to avoid photos that are blurry, out of focus, not well-composed, or poorly lit. When we are talking about low-quality photos, we’re talking more about the content of the photos themselves. That tends to be where many of the worst mistakes appear. You want to avoid:

Generic photos. Hiring a photographer to create unique images is ideal, but sometimes stock photography is your only option. You want to avoid using the same boring images that everyone else is using, and images that are clearly stock photos. Web users can be a fairly savvy bunch, and if they see the same “professional woman” or “elderly man” on multiple sites, they will notice — and they might think you are lazy or unprofessional. When searching for images, look beyond the most popular selections, and choose photos that haven’t appeared over and over again on 1,000 sites.

photo collageGeneric, boring sizes. Not only are generic stock photos boring, but so is a design that only incorporates photos in the same sizes and shapes. You don’t want to create a chaotic design with a bunch of different and random shapes and sizes, but don’t be afraid to mix things up a bit and show some creativity.

Fear of cropping. Careful cropping of photo can take a photo from blah to wow. By cropping a photo, you can show more detail and create a focal point to draw users attention where you want it. When looking at the photos you’ve selected, consider whether cropping out unnecessary elements would make the photo more impactful, and don’t be afraid to be a bit ruthless.

Unedited photos. We aren’t talking about achieving perfection here — no need to get crazy and turn your staff into a group of supermodels for the “About Us” page. However, don’t be afraid to do some cleanup in an image editing program where necessary. This means cropping out distracting background elements, removing red eye, adjusting the lighting and shadows, and removing small flaws (like the one hair flying in the wrong direction). If you don’t know how to edit photos, ask someone who knows for help — or select a different photo. Remember that you can’t “fix” a truly terrible photo into something great with digital editing, and sometimes it will be easier, and less expensive, to just get a different image.

Wrong technical specs. While this doesn’t really relate to the content of your images, when the technical specifications are wrong, it will reflect poorly on your site. For example, photos that are too large (meaning that the resolution is too high) will take forever to load, while those that are sized incorrectly will look weird when the site goes live. Again, crop carefully, and choose the lowest resolution that still looks good to keep page loading speed fast.

It is possible to design an attractive website using stock photography and your own photos. Just be aware of the common pitfalls, and do what you can to avoid them. You’ll have a more successful site — and a stronger brand.

What Is Negative Space and How Does It Apply To Web Design?

Negative space is one of the most important principles of website design. It is the space between the fonts, images, graphics or any other design elements on the web page. If we are able to take control of this space, we can make great use of one of the defining components of web design. Although, negative space is often ignored by novice designers, the experienced ones thoroughly comprehend its importance and put it to great use. The pointers discussed in the post will definitely aid the design process and help the designers make the best use of the negative space.

Negative Space Examples

For instance, the Google’s home page showcases a terrific use of white space or negative space. Due to the white open spaces in the web page, the colorful logo of Google stands out and achieves our maximum attention.

google

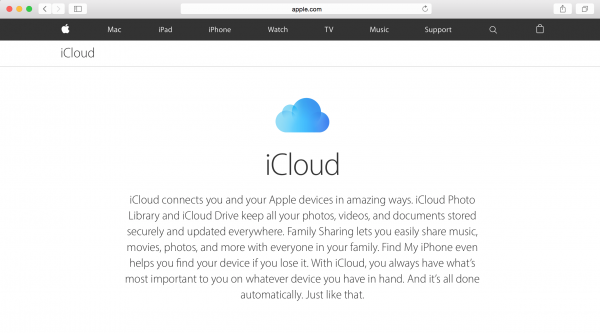
If we look at the design of Apple’s iCloud, we find that the entire meaning of the logo comes from the negative space with just an outline of the cloud drawn. There are times when negative space is used to add sophistication to the design page. There are a plethora of such examples where negative space has brought about the positivity in the web design.

icloud


When the spacing is performed efficiently in a web page, the page becomes easy to scan which contributes to the overall user experience. For starters, we will throw some light on how we can utilize the negative space to its full potential and enhance the legibility of the web page.

What Exactly Is Negative Space?

Negative or white space is an empty space between design elements, be it text, images, or graphics. This is the space that lets the positive space stand out. We can draw an analogy here and compare negative space to open spaces in a showroom and positive space as places to display the product. If there is no open space, you cannot really view the products with the same ease as the case might be with open spaces. It is as if they complement each other. Coming back to web design, at times, negative space renders a whole new meaning to the design when the role of negative and positive space is reversed.

Micro negative space

Micro negative space refers to smaller volume of space around the design elements. However, the importance of this space has nothing to do with the dimension. In its correct definition, the micro negative space is between the paragraphs, lines, letters, and such small elements. Proper use of this space around the text makes the design attractive and legible. It becomes easy for the users to find what they are looking for, in the web page.

Macro negative space

The whitespace that is left unused around the header and footer of the web page is known as the macro negative space. As this space is larger as compared to the space between the text and lines, it is called macro space. Macro negative space needs to be managed smartly as it can hamper the overall design layout of the website.

How To Utilize Negative Space In Web Design To Its Maximum Potential

When it comes to web design, negative spaces acquire a slightly new dimension as compared to print designs. These spaces need to be utilized depending on a lot of factors. If you are brand like Apple and are highly confident of your product, you let the products do the talking. You do not cram the space with texts that desperately to promote cheap offers and deals like other small brands do.

Here are some of the ways you can utilize the negative space efficiently:

Do not consider empty space useless

Negative space should never be considered useless. It brings out the best of the positive space and hence, it should be used judiciously. You can base the color, font, size of the text, etc. on the negative space and produce a striking contrast for the visual delight of the users.

Content Hierarchy Should be Clear

By content hierarchy, we mean that the text that appears on the web page must have font chosen that clearly depicts its position. Negative space helps a lot in achieving this hierarchy and emphasizes on the features that ought to be shown prominently.

Negative And Positive Space In Competition

At times, creating a design while making the positive space compete with the negative space can work wonders. If you use equal measures of both the spaces, you may come up with a design that has the dual dimensions. Depending on the perspectives, users can see two different versions of the design.

Balance between different page sections

While managing the negative space, there has to be a consistency across the different page sections of the website. The amount of negative space that you use in one section should not be in stark contrast to another section of the same page.

Use Loads of Creativity

Creativity is an attribute that is a must in web design. You must be in a creative zone if you want to create something extraordinary with the negative space and add dimensions to your overall design.

Final Thoughts

Negative space has a huge role to play in accentuating the design elements in a web page. Smartly managed macro and micro negative space lead to an attractive, sharp and soothing design that appeals to the users.

Author’s Bio

The blog has been authored by Nola Arney, a senior developer at HTMLPanda– PSD to HTML5 Conversion Service Provider. Apart from being a seasoned developer, Nola Arney is also a prolific writer who loves to write informative yet interesting writeups on an array of topics ranging from latest developments on mobile developments to the innovations in technologies and the best practices.

15 March 2016

Adobe Experience Design is Launched as Sketch Competitor

adobe sketch

Sketch has been quickly growing support as the defacto choice for website and user interface design. Released late in 2010 it has continued to enjoy updates and a growing user base.

Supporters have long made the argument that it is hands down better than Photoshop. It’s not too hard of an argument to make as Photoshop was created by Adobe as a photo editing tool.

How Sketch Got A Head Start

Sketch was able to capitalise on this and build an application that is vector based. This means that quality is not compromised by the size. This is important as Photoshop is not vector based it required users to make objects Smart Objects. Sketch champions that they are vector based and pixel aware.

Sketch looked like it was going to run away adding features like objects without hidden paths, snap to pixel, dynamic properties, reusable elements, and many more features.

Adobe Looks To Compete With Sketch

Adobe took note and almost 6 years after the launch of Sketch they are launching Adobe Experience Design CC. The project was originally known as “Project Comet” (because code names cool). Today it was released for Mac OS X, yet a windows version will be released at a later date.

Adobe Experience Design (shortened to XD) is available for (free!) download for users with an existing Adobe account. Even though Adobe has been slow to react to Sketch it has given them time to see what users like and dislike about the app. Adobe also is releasing the application to it’s much larger user base.

XD big sell is that it allows you to build an experience from the beginning to the end. It also seamlessly integrates with your existing Creative Cloud suite. It allows you to go from wireframes to interactive prototypes. This brings in functionality that has recently become popular with apps like InVision.

adobexd_hero

Adobe Experience Features

The app is still in being rapidly developed yet there are already many features that are sure to make it popular with designers.

User Interface – The UI has a nice clean aesthetic. This is greatly appreciated as the existing Adobe suite is starting to feel bloated and aging.

Draw Vector Artwork – A feature of sketch you can use the tools that you are used to using in Illustrator to create vector graphics. You retain total control over the objects allowing you to edit border color, thickness, etc.

Photoshop & Illustrator Integration – You can pull .svg from Apple Finder but also from AI & PSD. To do this you just need to copy and paste into XD. Because it is a SVG you can edit it directly in XD.

Multi Screen Artboards – Adobe XD starts with an infinite canvas, from there you can choose to create an artboard. It allows you to create an artboard by device size (iphone6).

Repeat Grid – This is one of the most powerful tools that Adobe has put in XD. Once you have a screen with an item that needs to repeat you can select the item you want to repeat. From there you can select “repeat grid”, as you pull down the app will automatically repeat that object. Making a blog just became easier. The styles are global so a change to one of the objects will change the content in the rest of the screens. Repeat grid allows the individual content to be unique. This means that you can change the text or images to the uniform style.

Export Features for Production – Website and application designs don’t stop with the design. You still need to pass your designs to development. XD allows you to export assets as either a PNG or SVG for your development team. You are also able to save for iOS, web, or Android. You also have the ability to minify the size for the SVG direct from the export feature.

Mask Items and Add Images – You can bring any bitmap from photoshop to work with in XD. You can easily mask an image directly in XD. Once you have added an image it becomes the fill and will never become distorted.

UX Prototyping Tools – When you are done designing you can switch to the prototype mode in the top left-hand corner of XD. Once you have selected the prototype mode you can click and drag to map the application interactions. The preview tool makes it easy to test that your buttons are correctly mapped.

repeatgrid-image-730x410px

Record User Tests – This is where Adobe pushes past Sketch and starts to move into UX tools like InVision. You can create a recording of a user’s interactions with your prototype. Once you are done you can save a .mov file directly from the application. This lets your stakeholders view how users are interacting with your prototype.

New Adobe XD Features

The Adobe team is just getting started. They have mapped their future features in blog posts that you can read here. Highlights of the list include: real-time design preview and testing on mobile devices, responsive design support, API creation for plug-ins, and more design features.

How Will Sketch Respond?

It will be interesting to see how Sketch responds. Almost all graphic designers use Creative Cloud so using XD wouldn’t be a big switch. Sketch does have a much larger plugin library and pricing model.

Pricing?

Right now EX is free for users with an Adobe ID. Eventually it will probably be added to Adobe Creative Cloud which offers software for a monthly fee. When Adobe switched to the monthly model many users were upset and felt like they were being held at gunpoint. Adobe made the move to increase recurring revenue, increase adoption of their newest version, and decrease pirating of their software. Sketch, on the other hand is offered for a one-time cost of $99.

Conclusion

Adobe realized that UI/UX design has moved very quickly. As there are multiple devices and platforms designers need to show designs as working prototypes. Adobe XD is drinking their own Koolaid. They are pledging to update the app monthly based on feedback from their users. We’re curious to hear your thoughts. Drop them in the comments below. Are you going to switch from Photoshop or Sketch to Adobe Experience Design?